
Project Overview
For this project, the brief was to create a 3D model of a small object (must fit into palm of hand), scale it up to fit a 40x40x40cm box, and then reproduce it as a card model. The following is my process documentation from start to finish, including ongoing reflection on my design decisions, and my finished craft.


Before starting on the project brief, we experimented in studio with simple geometric shapes out of cardboard to get used to the materials. This was very helpful in starting to develop a crafting process, taking it from the printout paper template all the way to crafting the object out of card. For my first attempt I was very happy with how my model turned out, as attention to detail had produced beautifully clean edges and level surfaces. I learned the importance of being even more precise with all cuts, as my model had some very minor misalignments causing small gaps, and learned that the best order of cutting would be (1) scoring fold lines, (2) cutting glueing tabs, (3) cutting out the shape.
Choice of Object
These were the items I brought into studio for selection. After discussing with my tutor, we agreed that the ones to the left were too simple in terms of their shape, whereas the balloon dog would present a challenge. I enjoy taking up a challenge and was confident in my paper crafting ability but I was also very aware of having no prior experience in 3D modelling. I planned my approach and set myself a deadline until 3 days before the submission deadline to work on the ballon dog, at which point I would switch to a simpler object if I could not complete the dog model to the unrolling and printing stage.


Product Photos
Measurements & Modelling


Taking Measurements


It was my very first time using any kind of 3D modelling software and for the first week of this project I mostly struggled with understanding how to use Rhinoceros 3D. I had a broad idea of how to model the dog in my head, but I could not seem to translate this idea into the software.
Essentially the dog is made out of multiple sizes of the same shape - a type of ellipsoid/tube - all connected together at various angles. As such, before thinking about the complete model, I worked on making this shape and learning how I could manipulate it. Now looking back at it after 10 days of this project and Rhino taking over my life, it seems incredibly simple, but at the time I was struggling a lot and spent hours on end looking for and watching tutorials that could explain the many questions and roadblocks that were coming up for me.
The main issue for my model was its shape. Doubly rounded curves/surfaces cannot be unrolled and made 2D, so I had to find a way around all of these curves, turning the model into a lower poly version. I modelled the base shape as multiple iterations of both the NURBS and Subdivision functions, used mesh to try and manipulate it further, played around with different densities of the isocurves, all in an attempt to simplify it and get one step closer to a full model.
While at the time it felt like I was stuck in a loop of questions that I couldn't find answers to, considering I was brand new to the software and the concept of 3D modelling, I actually learned a lot. I now feel relatively familiar with the main ways you can approach modelling an object from scratch, and I got exposed to a lot of specific functions. Seeing the box view of my SubD iteration started giving me an idea on how I could approach modelling the dog differently (making the legs octagonal instead of tubes), gave me an idea of the complexity of the unrolled surface (and the need to reduce this as much as possible), and taught me that when unrolling a more complex polysurface, exploding it into its individual surfaces is not a viable option, as it produces an unmanageable string of small pieces which would greatly increase the assembly time.


My first attempt at producing the full model was still very far from what I needed to make a working template, so to get a better idea of what a low-poly model could look like and where to start, I spent some time finding paper craft examples of balloon dogs.

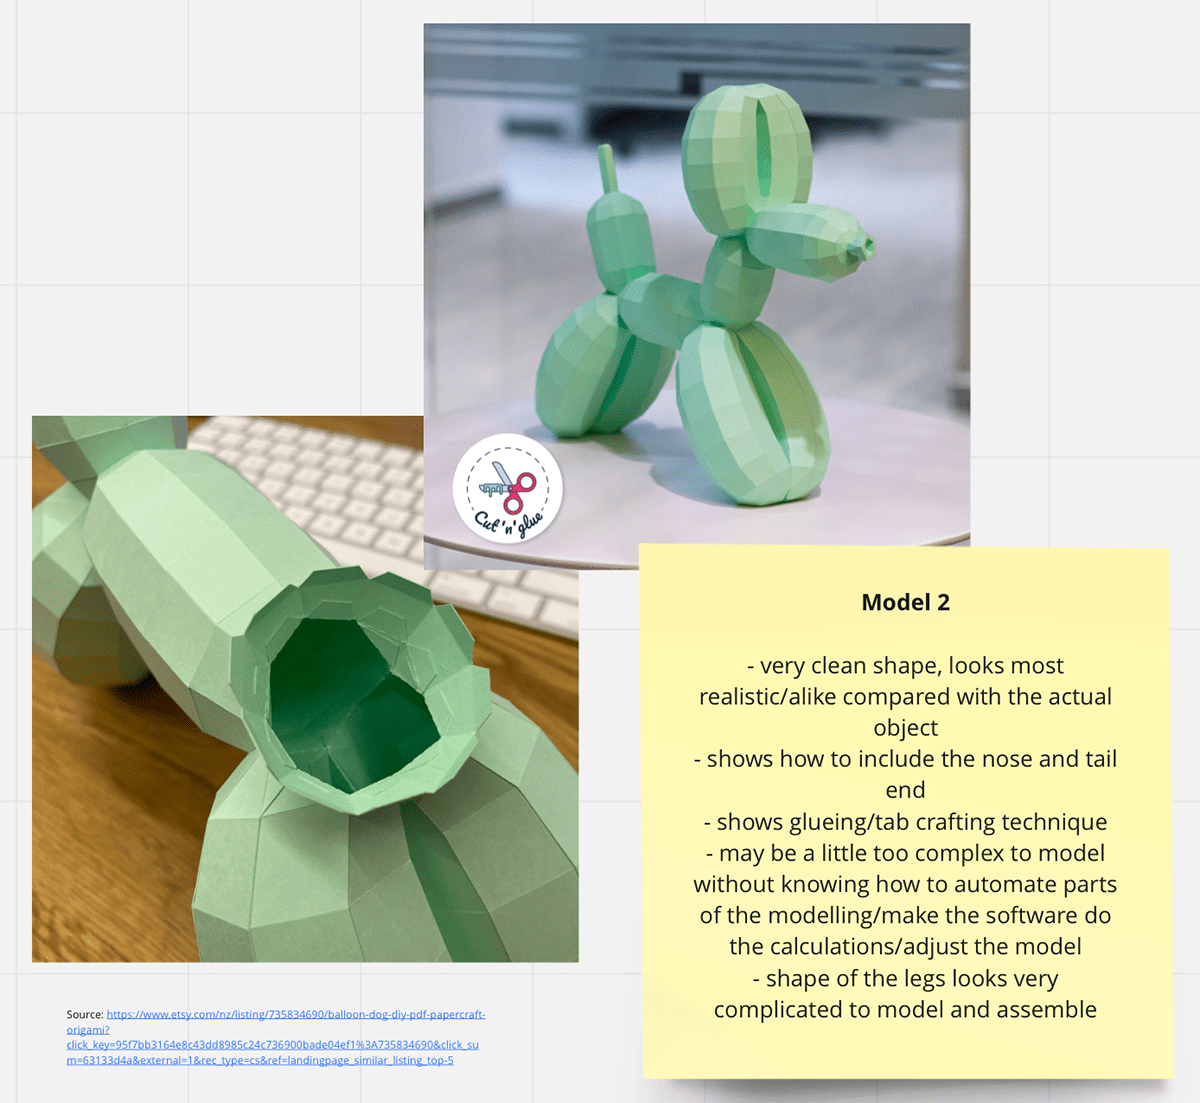

My research gave me a much better idea of how to start modelling my object (an octagon as the base shape), as well as a reality check in terms of time allocation. The creator of model 3 stated an approximate time of 13 hours for assembly, meaning I would need to complete the 3D model to print within the time frame I had set at the start of the project to have a chance at finishing it.

Using polylines I was able to create the exact shape I was looking for and further manipulated it to make up all of the individual pieces. I modelled my second attempt at the full model and was pretty happy with the overall shape & dimensions. At this stage the individual surfaces still needed cleaning up, correct alignment, and I needed to figure out a way to get rid of the overlap of the individual poly surfaces to be able to unroll the model. The intersections also still had a lot of very small gaps where the pieces didn't align properly.


I was regularly reaching out to peers, tutors, and good ol' google for feedback and help with modelling, but no one seemed to know how to get around the issues I was having. I got feedback to switch to a simpler model from all of the above sources, and as it was getting close to my first deadline I looked for a different object to model as a backup, settling on the below.


Scaling Up & Unrolling


Print, Cut & Reassemble
The process of modelling this object was significantly simpler, only needing a slight remodel to work around the doubly curved top of the applicator, which allowed me to progress through to printing and prototyping quickly.


For a first draft I was satisfied with my prototype, and I learned a number of valuable lessons: attach glue tabs to the bottom circle instead of the part that wraps around for easier assembly and more even surface; be more precise about the assembly overall (I did not put maximum effort into the prototype); change the top third of the model, as with the existing pieces it was very hard to do a clean job of putting it together. I made the necessary changes on the 2D template, remodelling it from a circle (top view) to an octagon.


The New Templates
I then had another feedback session with my tutor, a little over 24 hours before the due date. I went into the session with my prototype of the bottle and a plan of making another 2-3 iterations until settling on the one with the highest degree of craft and reproducing it out of the final material, before finishing up my process documentation and reflection. My aim was to submit the night before the due date and I was well on track.
However, the feedback I received very much steered away from the bottle and circled back to my original model, strongly encouraging me to continue working on the dog and see if I could figure out how to unroll the model and at least assemble it in part. So with about 24 hours to go, I went back to the drawing board.


I remodelled the legs & ears (see sketches further up) and mirrored them so they would be symmetrical. The model was starting to look really great, however, I was still having multiple issues with unrolling it into a 2D shape. I had (1) many overlapping polysurfaces that needed to be merged into one or split (both of which seemed to not be possible with the surfaces I had created, despite many rounds and sources of help-seeking); (2) I was unable to explode the unrolled surfaces as there were simply too many pieces; and (3) couldn't leave them as a single shape either because they were too intricate to fit onto A3 sheets of paper and in some cases overlapping.
To get rid of the overlaps, I had to create A LOT of copies of my model and get really creative with using different cut/trim/split commands to manipulate the individual components. Most of the time they didn't work as intended but after spending quite a lot of time here, I got to a stage where the simpler shapes (face, nose, tail, belly, neck) could be unrolled as is, in most cases without having to split into more pieces. The ears & legs, being more complex could not be unrolled as one, for reason (3) above, so after scaling the model up to the required size I separated all of the pieces and chose cutting points to divide them into sections and unroll individually.


At the upscaled size, the pieces were too large to fit onto an A1 sheet of paper, so I had to scale them down a bit.


With the encouragement of a trusty little helper I reassembled the first prototype out of paper. The main learnings from this iteration were tab placement and size (big enough and more importantly on the right side), different ways of attaching the pieces to each other (turning all the tabs inwards and using a lot of glue looks a lot cleaner), and the importance of precision (one small change in the angle of a piece at the bottom of the leg can cause issues trying to attach the leg to the rest of the body because it won't line up perfectly).
I also learned that it would have been easier to make legs & ears one piece instead of separating then into the individual pieces for unrolling and that assembling the pieces in strips rather than rounds may be easier (but no time to go back to the model to change this); and it's easiest to assemble both legs together from the bottom up instead of each leg individually and then trying to glue them together. I would have liked to do at least 2 drafts before moving onto my final product but had no choice due to time, so I took these learnings and applied them to crafting my final product.


Final Product
In the limited time I had left, I managed to craft the legs, belly, neck and face (the latter can only be attached while simultaneously attaching the ears, due to the weight of either cancelling each other out and keeping the model stable and aligned).


Final Thoughts
Overall, I am very happy with the result of this project. While it is unfortunate that I did not have time to finish the ears, nose and tail, I am proud of how much I was able to complete in such a short time, especially with the last minute change in direction. The assembly was very challenging, particularly the intersections of the pieces, and the end result is not quite as clean as I would like it to be. Nevertheless, it is still clear to see that a lot of dedication went into the making of this object. To improve the paper model, I could change some of the tab placements or go back to the model and change the way that the pieces intersect, creating a simplified polysurface to connect them.
My final 3D model turned out much better than I could have imagined just over a week ago when I was struggling to model a tube and had no idea how to move it, let alone connect it to anything else or change its shape. From the feedback I got from my peers and tutors, it only takes one glance to know what the object is, and the dimensions and shapes are very representative of its source model, despite the change to low-poly. If I had more time I would go back to the model to simplify it further, improving the cut lines at the intersections and reducing assembly time as much as possible, and with the 3D modelling knowledge I have now, I am confident I would be able to.
Doing a similar project again I would definitely stick to the plan I had made instead of changing at such late notice. While it was fun to see the project I had worked on so hard come to life, letting myself be persuaded to try something I realistically did not have the time for affected the quality of the final product, not to mention my other commitments.
So, what did I learn that I haven't already mentioned above? Everything is figure-outable and that creator was not kidding when he said it would take approximately 13 hours to assemble a balloon dog out of craft paper.
Until next time ;)
